WILL VPN App - VPN App With Admin Panel | Secure VPN & Fast VPN | Refer & Earn | Reward Lucky Wheel | Documentation.
Author Message
Dear Customer, Please Follow the Instruction of Documentation for Steup the App By Itself.
Or If you Want to Take Installation Service, You can Contact Via OneLancer.net , WhatsApp or Skype Or Email, Installation Service Will Extra Chargeable.
WhatsApp :- +91 9009308065
Skype :- Will_Dev
Introduction
Thank you for purchasing the app. If you have any questions that are beyond the scope of this help file, please feel free to message us via our user page contact. Will VPN is very fast and secure VPN app with unlimited bandwidth and it’s have lot of secure servers in this VPN app when you can Scroll down the Servers You can See more & more servers. In this VPN app you can connect any country server on only one click. And in this app You can add Unlimited servers. And In this have Powerful Back-end for manage All things, Like Users, Notification, Servers, Ads, Reward Points, Lucky Wheel and etc. Now you can easily unblock those geo-restricted websites and gain access. In this app have Reward Video Ads For Unlock Premium Servers. You will get the Revenue By Subscription & Reward Video ads, Interstitial ads, Banner ads. We have Integrated Facebook and Admob Ads.
Whats Include?
- Android App (Android Project File)
- Note :- Admin panel File is a Stand-Alone file, To Download in free Contact Us.
- Admin Panel *Note :- ( We don't Sale PHP file on Codecanyon. We are Providing Separately via Our System. ) Need to Create Support Ticket for PHP Files. We will Provide in Free of Cost You can Email us Via Profile Click Here *Send File Request from Your Purchased Account*
Admin Panel Configuration
To install the admin, follow the steps below:
1. How to upload admin panel to server
- Upload Admin Panel Zip file in your hosting path..
- Extract Admin Panel zip file on your path.
- After Extract Open yourdomain.com/install/index.php After that You will be Redirected on Install.`
- After that input the credentials. Like Envato Purchase code, Envato User Name, Database Details. .


2. Where Is My Purchase Code?
You can find out the purchase code on your Envato Purchase Statement
- Log into your Envato Market account.
- Hover the mouse over your username at the top of the screen.
- Click ‘Downloads’ from the drop-down menu.`
- Click ‘License certificate & purchase code’ (available as PDF or text file).

- click here where to insert purchase code
Firebase & Login Configuration
1. Setup OneSignal

2. Setup login Via Gmail
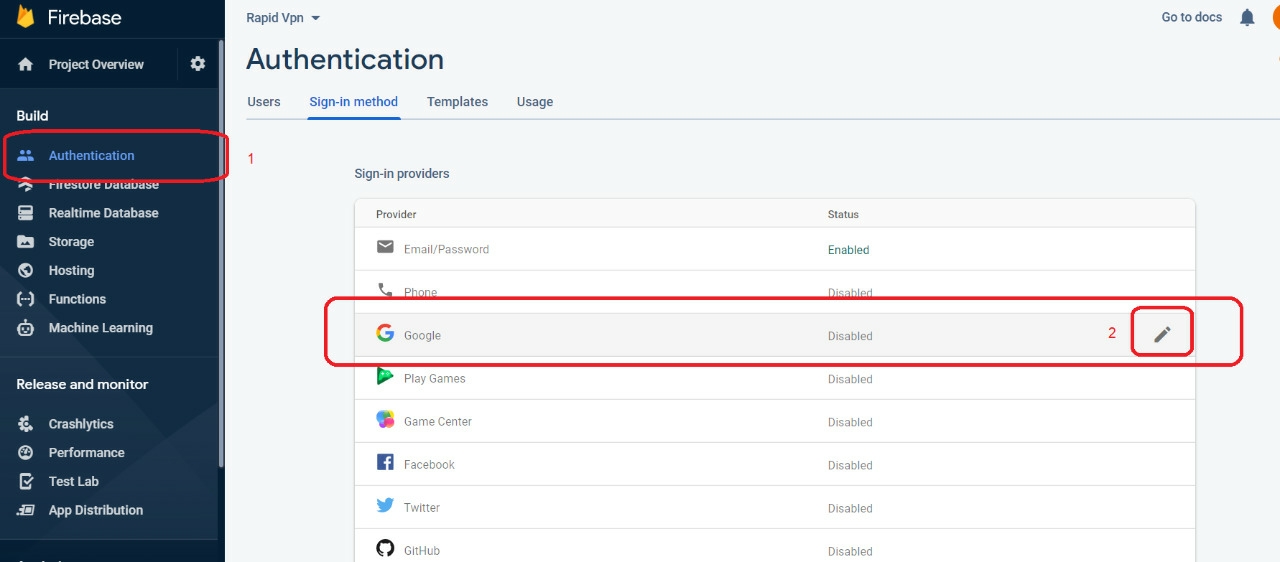
next up you have to Enable Gmail Authentication in Firebase Console by going to :
- click on Authentication > Sign-In Methode > click on Gmail
- enable it and save


3. Get fcm server key
- go to project setting
- click on cloud messaging tab
- now you get the fcm server key


4. How to insert sha1 fingerprint
in an Android project there are 2 fingerprints for each application, debug and release. Get the SHA1 Fingerprint then fill up SHA certificate fingerprints on firebase, you can follow the step below:
click here how to get android project SHA1
- go to project setting
- click on general tab
- add new fingerprint

NOTE: if you upload your application to the playstore, you need to add playstore sha1 certificate here, if you don't add it the application doesn't work properly.
5. Setup SMTP Mail for Work Registration and OTP
First You need to Create Email from your cPanel Account
After that You need to Use that Email and Password inside SMTP setting field
After that Go to your Email List and Click on Connect Devices and You will Get SMTP host and Port Details


You need to Put your SMTP details inside SMTP setting menu

1. Setup OneConnect Key
If you want to use Onceconnect.top Server, You Just need to Put OneConnect API Key inside OneConnect Server Menu and Enable OneConnect Server, Then Inside app Server will Load Via OneConnect SDK https://developer.oneconnect.top/ Then the Server List Will Show Automatically inside App Via OneConnect Key Or If you want to Use Your Own Country Server file, Just Put your Country Server file details below.
# This Project Content OneConnect Library # For Use, the SDK Required OneConnect API Key, Visit on this Website https://developer.oneconnect.top and Create Account and get the Key. # Once You have the OneConnect API Key, Then You have Put inside OneConnect Key Menu You will Get the Key inside API Tab https://developer.oneconnect.top/dashboard/api/ After that, You need to Put Your App Package Name Inside OneConnect API Tab.# You have to Put inside OneConnect Menu Please See Screenshot

7. Start.io Live Ads Setting
First You need to Open AndroidnMainFest.xml file, After that you will See Option to Add Start.io Ads key on line Number 78

After that You need to Open MainActivity.java file, After that you will See Option of Start.io Test Ads, You need to make test mode "false", After tha inside your app Show Live Ads.

7.a Unity Live Ads Setting
After that You need to Open MainFragment.java file, After that you will See Option of Unity Test Ads, You need to make test mode "false", After tha inside your app Show Live Ads.


Android Configuration
In installing the Android application it will be more complex, follow the steps correctly so that the application can run properly.
1. How to open project
- open Android Studio > Open an Existing Android Studio Project > Select Your Project build.gradle file > ok

- browse to directory where you place "Will_VPN" project and click OK.

2. How to change Package Name & Setup Subscription
after you open the android project, please change the package name first
- close / unselect “Compact Empty Middle Packages”

- then, right click "refactor->rename" your package and rename it.

2.(a) How to Subscription
After create subscription copy the product i'd & Licence key and go ( app\src\main\java\com\Your_Packege_Name\app\config.java ) to and paste it their.
after this all you need to update your app on play store
- Follow Below Steps


3. How to change app name
- open Android Studio >app > res > values > strings.xml
- enter your app name inside "app_name" string tag

4. How to change app icon
- open Android Studio > app > res > all mipmap folder > ic_launcher.png
- rename your icon with ic_launcher.png and paste in mipmap folder
- replace all icons with particular size in particular folder
- And Also Change > app > res > drawer > logo.png

5. How to insert url
Please make sure You have Changed Base_url in both Place. app\src\main\your_package_name\vpn\api\WebApi.java And Also inside app\src\main\your_package_name\vpn\fromanother\util\util\Constant.java
For Change Base Url Go to Your Android Project and You will See gradle.properties file.

6. Generate signed APK then create new key store
- click build > generate signed bundle/APK


- make new key store to get "JKS FILE"

6. How to get sha1 fingerprint
in an Android project there are 2 fingerprints for each application, debug and release.
- run the signing report you will get a release and debug the SHA1 fingerprints


- add your SHA1 fingerprints debug and release on each application and copy to each firebase project, click here where to insert the sha1 fingerprint on firebase
- after entering all sha1 fingerprints for each application on firebase, download the google service json again and paste it on all applications

NOTE**: After that clean and rebuild the Project.
Or/
- If you want, You can also Get Release Sha1key Via Play Console, But You will Get After Upload Apk or Abb file.

Friendly ASK Questions
1. Why IN-App-Subscription Not Working ?
I have attached a screenshot please check. Click Here
After create subscription copy the product i'd & Licence key and go ( app\src\main\java\com\Your_Packege_Name\app\config.java ) to and paste it their.
after this all you need to update your app on play store
Plan I'd and Base Plan I'd will be Same, Mean create 1 Plan > Put I'd after that Create Base Plan using same I'd Inside that and Select (auto-renewing) then Put Your Price.
2. Why Server is not Loading or Showing Failed Try Again ?
Please make sure You have Changed Base_url in both Place. app\src\main\your_package_name\vpn\api\WebApi.java And Also inside app\src\main\your_package_name\vpn\fromanother\util\util\Constant.java
3. How to Add More Server ?
* For add paid server, you will need to buy from https://developer.oneconnect.top/packages/ go on their site. after you will see many servers list click on that servers that you want
after you will in right side , this option ( OpenVPN Config file ) click On this then it will rediracte in this another page
then you need to select OpenVPN Configuration (UDP) after download open that file with notepad and copy all the text. Now we will add this server in admin panel.
- Add servers flag
- click on add servers paste all text in [ OVPN Configuration Scripts ]
- Add username & password Default password is - vpn
- Now select VPN type
CLICK on Add servers now its done.
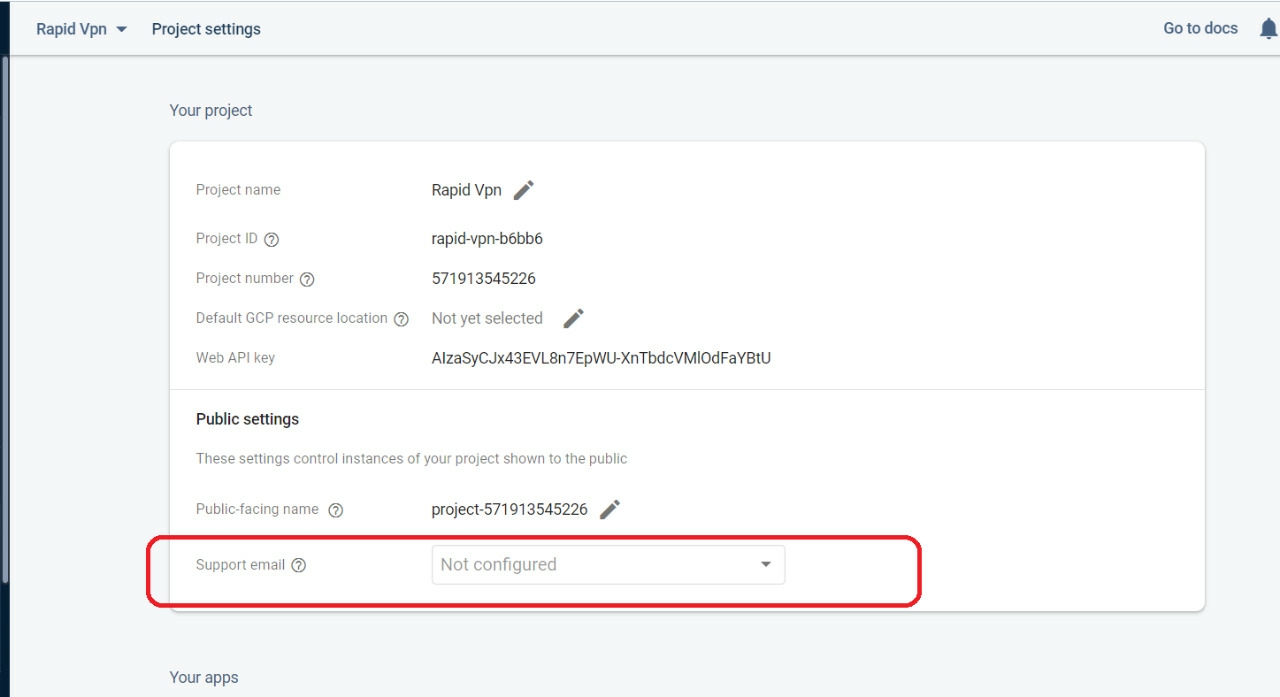
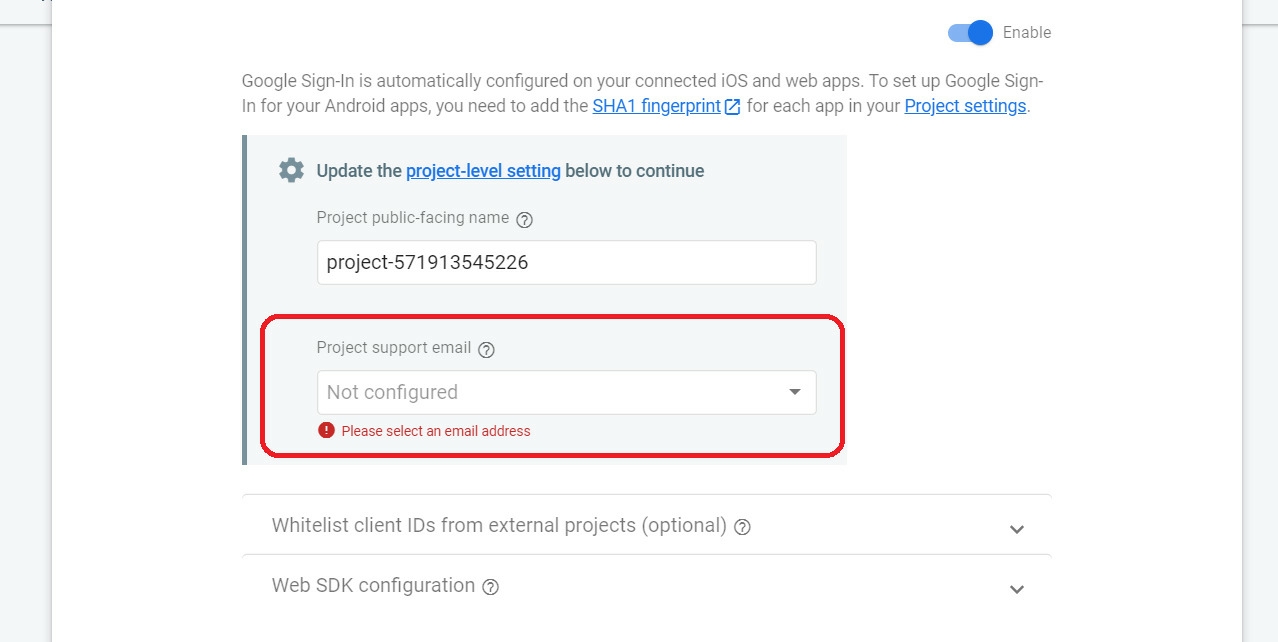
4. Why Google Login Not Working ?
Please Select you Email on Your Firebase Project for working Google Login. Please Follow the Image Instructions. And Also you need to add sha1 key inside the firebase setting, You will get sha1 key from your Google, play Console.
5. Why Showing Invalid Signin Dialog ?
public API(Activity activity) {String apiKey = "will_dev";
salt = "" + getRandomSalt();
sign = md5(apiKey + salt);
package_name = activity.getApplication().getPackageName();
}
public API(Context context) {
String apiKey = "will_dev";
salt = "" + getRandomSalt();
sign = md5(apiKey + salt);
package_name = context.getApplicationContext().getPackageName();
}
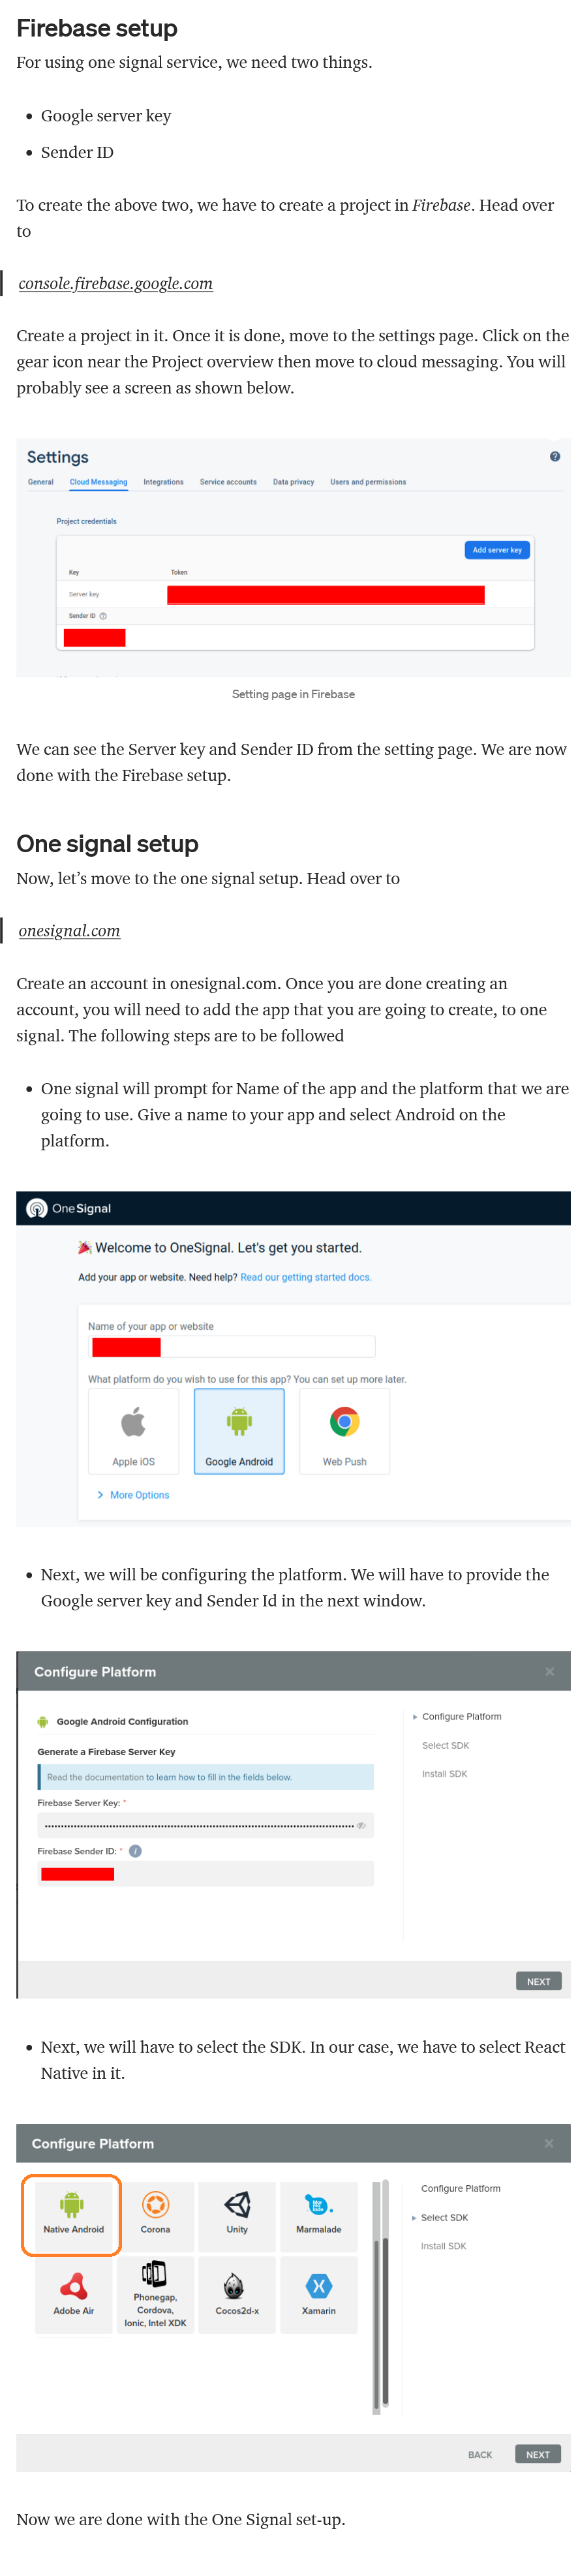
6. Why Not Working OneSignal Notification ?
Follow the Image instruction for Setup One Siganl ID. View Image
7. Why Login is Not Working of Admin Panel After Sucessfull Installation ?
8. Why Server Dissappeared ?
Any Of One Ads Type should be Active for Showing the Server
9. Why My Ads I'd not Showing ?
Make Sure your Ads Account is Approved, Make Sure You have created Ads I'd Perfectly, Make Sure you haven't changed the Ads I'd inside Android Project,
Note :- Check the Ads Via Test Ads I'd, If Test Ads I'd is showing perfectly then your Ads will SHow if your Ads Account is Approved.
Once again, thank you so much for purchasing this theme. As I said at the beginning, I'd be glad to help you if you have any questions relating to this theme. No guarantees, but I'll do my best to assist. If you have a more general question relating to the themes on ThemeForest,You can Create Support Ticket on Our Support portal. Click Here